Makes around 30 pierogi
Photos by Hannah Kaminsky
These vegan pierogis are originally from my cookbook Vegan Brunch, and for some reason I love to make them during Easter. I can’t be alone in that, so I’m publishing this recipe now to give you plenty of planning time.
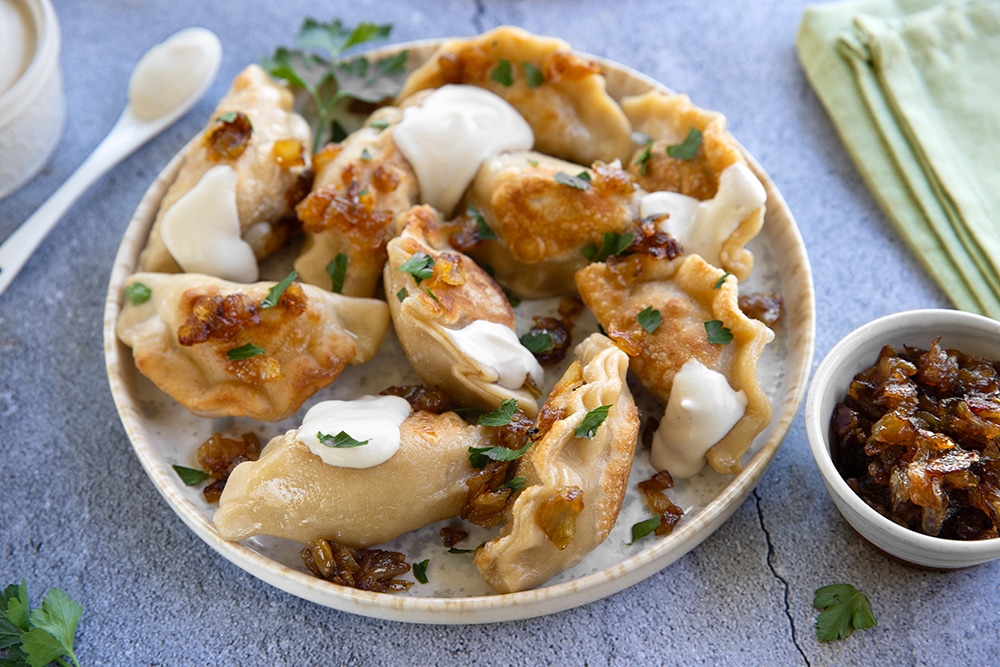
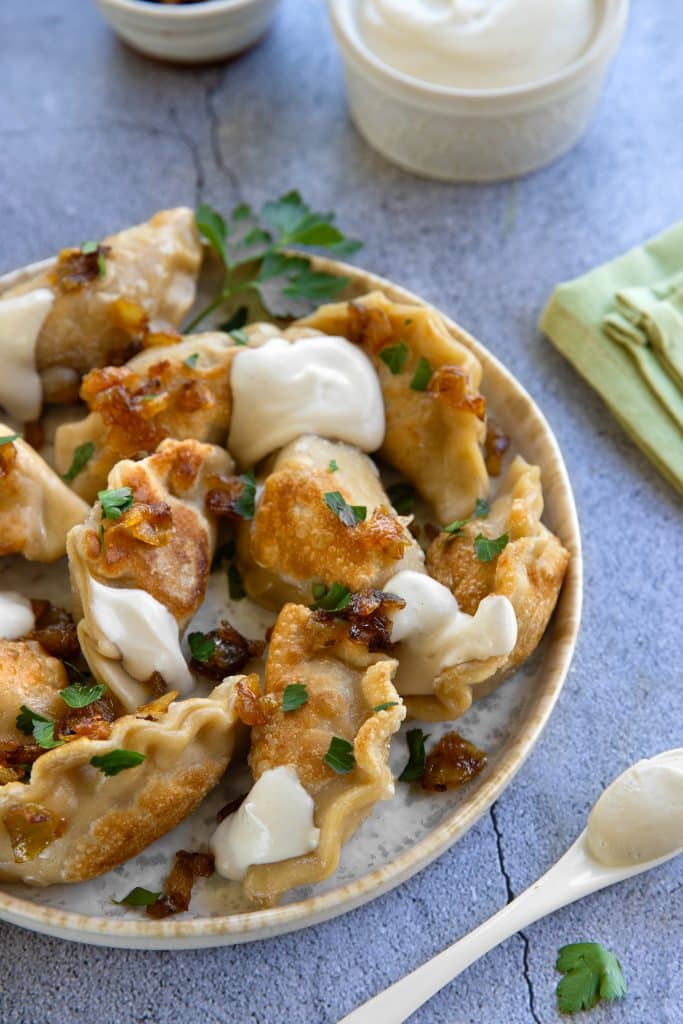
This is everyone’s favorite Polish potato dumpling. Toothsome, warm, soft and smothered in caramelized onions. Yep, that’s the stuff! Growing up in NYC, pierogis were a brunch staple. Polish diners were everywhere back then, and you could get a plate of these smothered in onions for like four dollars. Those diners are sadly mostly gone now, but you can live the life in your own kitchen.
This recipe makes around 30 pierogis, which sounds like a lot until you start eating them. It’s a project, that’s the truth, but it’s a fun one. Put on some music, get a friend to help, and make a day of it. Make the filling and dough the night before, then in the morning is roll, fill, and boil. Because the ingredients are so simple and unadulterated, choose good quality, organic potatoes whose flavor packs the most punch.
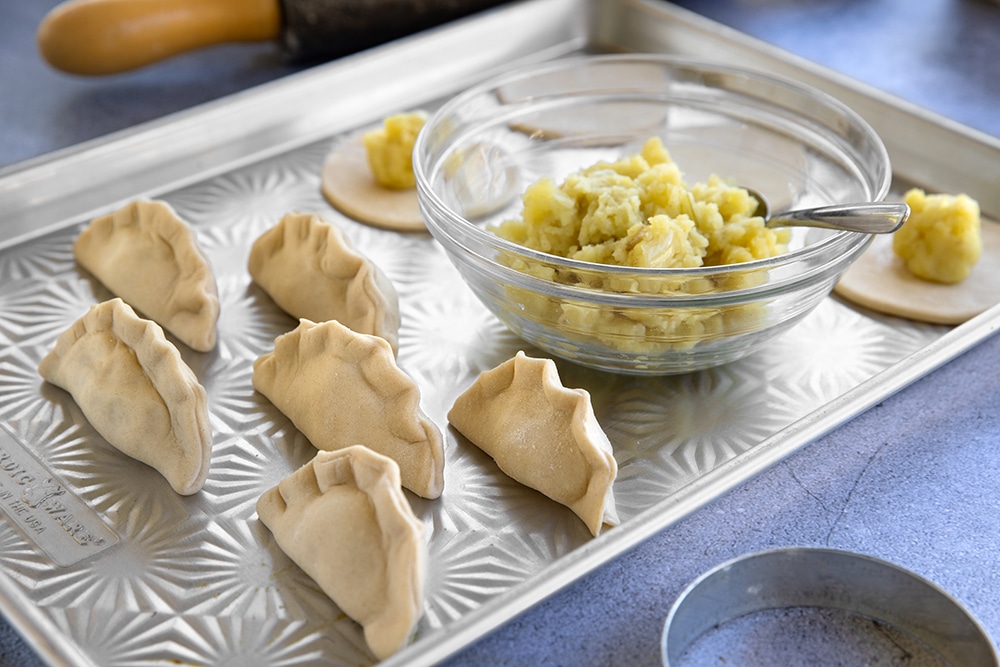
This is what they look like before boiling!
A note on the caramelized onions: don’t rush them. You’re coaxing the sweetness out slowly — low heat, covered, stirring every few minutes. It looks like an absurd amount of onion, but it all cooks down. If you’ve never tasted properly caramelized onions, you might be surprised that an onion is even capable of this deep, sweet complexity. Start them before you start rolling out the dough so you can stir between tasks.
This vegan pierogi recipe is one of my all-time favorites and perfect for Easter brunch or honestly any time you want pure potato comfort. Serve with homemade sour cream, if you like.
Vegan Pierogi FAQ (Everything You Need to Know)
Can I make these ahead of time? Yes! Make the filling and dough the night before. Wrap the dough in plastic wrap and refrigerate, and let it sit at room temp for at least 30 minutes before rolling. You can also assemble the pierogis, freeze them on a flour-dusted baking sheet, then transfer to a bag. Boil straight from frozen, they just take a minute or two longer.
Can I freeze these? Absolutely. Freeze them on a flour-dusted baking sheet so they don’t stick together. Once frozen, transfer to a bag. If you’re freezing them after boiling, coat each one with a little oil first. They keep for months.
.Any tips for managing the workflow? Start the caramelized onions first since they mostly just sit there. If you made the filling and dough the night before, you’re just rolling, filling, boiling, and making the onions. Clean your counter before rolling out the dough — a serene workspace makes all the difference.
Can I make these gluten-free? I haven’t tried. I would find a gluten-free pierogi recipe and use this filling to be safe.
Does a pierogi gadget make it easier? I’ve used pierogi presses to crimp, and they sort of work? If you want to give them a shot, just google it. Stainless steel ones are under $20.
Can I use a pasta roller for the dough? If you have one that is a great idea. I used to do that in the restaurant, it works great.
My dough circles keep sticking together. What do I do? Dust them generously with flour and keep them in the fridge between batches. If your kitchen is warm, the dough gets sticky fast. If they do stick, you can re-roll them.
How do I know when they’re done boiling? They float. If for some reason they’re not floating, about 4 minutes does it.
What do I serve these with? Smother them in caramelized onions and sprinkle with salt. Applesauce on the side is traditional. Vegan sour cream is great too.

Potato Pierogi With Caramelized Onions
Ingredients
For the Caramelized Onions:
- 1/4 cup canola oil
- 2 lbs sweet onions (Vidalia or Walla Walla) diced medium
For the Dough:
- 3 tablespoons canola oil
- 1 cup warm water
- 3 cups all purpose flour (plus a little extra for sprinkling)
- 3/4 teaspoon salt
Filling:
- 1 1/2 lbs yukon gold potatoes peeled and sliced, cut into 3/4 inch chunks
- 1/4 cup canola oil
- 1 pc small onion finely chopped
- 1/2 teaspoon pepper
- 1/2 teaspoon salt
To serve:
- Applesauce
Instructions
To make the caramelized onions:
- This is kind of an art, so don’t rush it! Since they onions can be left alone for intervals, start them before starting the dough, then take breaks from kneading the dough to stir the onions. The basic idea here is to sweat the onions, which means you’ll be gently cooking them, covered over low heat, and a lot of the cooking will be done from the steam as the moisture is released. You’re coaxing the sweetness out of them and locking it in. It looks like a lot of onion, and it is, but everything will cook down to manageable proportions, I promise. If you’ve never tasted caramelized onions, you might be surprised that an onion is even capable of this deep, sweet complexity, and with only two ingredients flavor.
- Preheat a heavy bottomed skillet, preferably cast iron, skillet over low heat. Add the oil and the onions and toss the onions to coat. Cover and cook for 20 minutes, leaving a little gap for steam to escape. Stir occasionally, every 5 minutes or so. Onions should turn a nice mellow amber, but not burn, although a couple of darker spots are fine.
- Remove the cover and turn the heat up just a bit, to a medium setting. Stir often for 10 more minutes. Onions should become a darker amber, and some of the moisture should evaporate.
Make the filling:
- In a medium sized pot, cover potatoes in water. Place a lid on the pot and bring to a boil. Once boiling, lower heat to simmer and cook for about 15 more minutes or until potatoes are easily pierced with a fork.
- Meanwhile, in a large pan, sautée the onions in oil over medium heat for about 7 minutes. Turn the heat off but stir occasionally even when the heat is turned off because they could still burn from the hot pan. When the potatoes are done boiling, drain them well and add them to the pan with the onions. Just mashed them right in there with a potato masher, that way you are sure to get all the flavor. Add the salt and pepper. Make sure potatoes are mashed well and fluffy. Set aside to cool a bit.
To make the dough:
- If you’re like me, you have limited counter space and so rolling out dough can be a hassle. I make the dough last because the mess becomes much more manageable when you don’t have to prep on the counter afterwards. It also gives your filling some time to cool. So make sure you clean up after your filling making and get someone to do the dishes for you. I find that a serene counter makes all the difference in dough making.
- Pour the water and oil into a large bowl. Add 2 cups of flour and the salt, keeping one cup aside. Use a fork to stir the flour in, and as it starts to come together, use your hands to knead until a loose dough forms (about 3 minutes).
- Sprinkle your counter with flour, then turn the dough out onto it and knead. Add the reserved cup of flour a little bit at a time, working it into the dough, until it is very smooth and elastic, about 10 minutes. If it’s too sticky, you can add a little bit more flour and knead it in, sometimes up to 1/4 cup extra. Conversely, if you get a good- feeling, smooth, elastic dough that isn’t tacky with less less than the extra cup of flour, then that’s okay, too.
- Now we roll the dough out, and also bring a salted pot of water to boil—, the largest pot you’ve got—, for boiling the pierogis.
- Divide the dough in half and make sure your counter is clean and sprinkled with a dusting of flour to prevent sticking. Roll half the dough out to about 1/16 of an inch thick, which is to say, very thin but not see through. I rolled it into an 18- by- 10 inch rectangle, but as long as you have the thinness going, the shape doesn’t matter so much. Sprinkle the top with a light dusting of flour.
- Now we’re going to make circles. I use the top of a glass that is 3 1/2 inches, but somewhere between 3 1/2 and 4 inches is perfect. Use a glass or a cookie cutter. Have ready a lightly floured plate to place the finished circles on, and go ahead and firmly press your glass or cookie cutter into the dough, as close together as you can. Pull the excess dough up and set aside. Place circles on the floured plate and transfer to the fridge while you repeat with the other half of the dough. Combine the excess doughs and see if you can get a few more wrappers out of the deal.

- NOTE: If it’s very hot in your kitchen there’s a chance that the circles will stick together. Sprinkle them with flour and make sure they don’t get wet to prevent sticking. If they do stick, you can roll them out and try again.
- Now we’re ready to boil some pierogi! Make sure your water is rapidly boiling. The filling should be room temp or colder. Have a small bowl of water for wetting the edges of the wrappers. Place about a tablespoon of filling into the center of a circle and dab water around the circumference of the circle. Fold the edges of the wrapper over filling and pinch in the middle to hold together. Pinch down the sides so that you have a sealed half moon. Don’t be shy with the pinching, and don’t try to make it look like perfect pinches. The most important thing is that you are getting them sealed, so use pressure and really seal them up. I think it looks really cool when the pinches aren’t perfectly spaced, it gives them a beautiful homemade rustic look and let’s you know that it came from a person, not a robot.

- If some of the filling is sneaking its way out, then use a little less filling with the next one. Once you get the amount of dough down, you can do a few at a time in assembly line style. I usually do six, lay out the circles, add the filling, pinch them closed. This works out perfectly if you time it with the boiling.
- To boil, gently lower pierogis in to the water with a slotted spoon. Boil about six at a time. When they float they are ready. If for some reason they aren’t floating, it takes about 4 minutes for them to cook. Use a slotted spoon to transfer them to a plate as you prepare the rest. Cover finished ones lightly with tin foil to keep warm. Proceed until all pierogi are boiled.
- If you’d like to fry instead: Preheat a heavy bottomed skillet over medium high heat, add a thin layer of canola oil, and fry pierogi on each side until golden brown (probably 3 minutes on one side and a minute on the next.) I personally prefer them boiled.
- I really like to serve the pierogi in an oversized bowl, sprinkle amply with salt and smother in lots and lots of caramelized onions.


Since going vegan eight years ago–and even in possession of Vegan Brunch–I have not had pierogies. This is unacceptable. Thank you for posting this and, thus, being the kick in the ass I needed.
Can I substitute the dough with pre made egg roll wrappers?
Homemade dough really makes it but I can’t stop you!
Recipes like this make me wonder how people can say it’s too hard to be vegan.
Well, of course, the recipe is excellent, but I think that you can not say that you don’t understand people who are not vegans. Not all people can live without meat on diet. Malcolm – order coursework here
This is creepy. You must be spying on me. After thinking about it for years, I finally tried my hand at making pierogies just the other night. I had a ton of filling left over, so I’m making them again tonight…and then I see this is posted!
They didn’t turn out that great the first time, I think I undercooked them and possibly didn’t roll out the dough thin enough.
I was told to boil and *then* fry them.
I never ate them from a Polish deli, we only ever had the frozen ones as a kid, fried with onions and kielbasa. The kielbasa was terrible stuff–tasty, but soaked in nitrates etc. The Tofurky ones are just as good and less deadly!
I see ALL. =^.^=
@April
Pierogies are our familiy’s only ethnic food (Isa, we have them for xmas and Easter!) and I was always under the impression you boil then fry. In fact, they’re two seperate preperations in our family.
Yes you do boil and then fry if you’re frying them. Ir you can just fry!
If I make the dough and filling the night before, would you recommend refrigeration or just put a towel over it and set it in a clean area of the kitchen? I grew up Polish and homemade pierogies from our church was a MUST. My mom even knows Mrs. T from the famous Mrs. T pierogies. (She’s from our area.)
I cannot wait to make these for this Lenten time of year and impress my family!
I should have written that in the directions! I would wrap in plastic wrap and refrigerate and let sit at room temp for at least 30 mins before rolling it. That’s amazing that your mom knows Mrs T!!!
Isa, Good to find you again. I made a tofu curry for my husband! I did not tell him it was tofu until after the meal. GIGGLES. You may remember me from the Nerd NYC picnic years ago where i gave you a bunch of tiny ceramic mis en place bowls I gave you. If you remember, I made the 20 sided dice pinata. Do you still have those bowls? You probably remember that my husband is a right wing nutjob who thinks tofu is an evil socialist plot………
I love pierogies – pure comfort food. Definitely going on my to-make list. They’re also good with potato and sauerkraut. =)
Gosh, Isa, you are too cute. Seriously, you’re such a gem.
I’m not a vegan but I am very much a Polish jew, and I CAN’T WAIT to make these for all my lil vegan friends! So excited!!
P.S. this website has made staying nourished in college sooo much easier, thank you thank you!
Pierogi. Mmmmhh.
For an even closer approximation of the regrettably non-vegan Polish original, one might add some crumbled soft tofu to the filling, with a dash of apple cider vinegar.
In my experience boiled pierogi freeze very well and will store for months (unlikely scenario). Hint: coat each with a little oil; otherwise they will form a large, inseparable sticky lump.
ps. What an impressive workflow, so much detail!
I love pierogies. A Ukrainian friend of mine taught me to make them several years ago. She sauteed the boiled pierogies in butter. Delicious! When I visit Chicago, I always go to a Polish neighborhood to find a plate of pierogies in a Polish restaurant. You’ve inspired me to plan to make some for Easter.
These look amazing! I don’t know if I am talented enough for this but I am sure going to try. Thanks for posting!
Pierogi are at every one of my family gatherings (holidays, parties, Sunday dinners, etc.), and I’ve missed them since going vegan. Thanks so much for posting this. I’ve had my fair share of rolling pierogi dough, filling, and forking (though I see you’re a pincher!) in my life, so I’m up for the challenge! I’ll try it your way the first time, but then I might try subbing sauerkraut for the potato filling.
I have made these and they were out of this world delicious. I definitely need to pull out Vegan Brunch and make them again!
Uggghhh yummmmm!
good method to make Potato Pierogi With Caramelized Onions. i want to eat immediately.
Cannot wait to make these.
If I need to freeze the left overs, is it better to freeze them before they are boiled, or after?
thanks!
Love your recipes!
Step 1 needs to be “Invite over a few close friends so that you can make multiple batches of these pierogi. Everyone brings a filling of his/her choice and a bottle of his/her favorite wine.” My friend Amy & I did that a couple of years ago (right after VB came out)–making pierogi with friends is fun!
[…] start to pop up on menus in my neck of the woods around the time of Lent, and according to a recent post at Post Punk Kitchen, Lansing isn’t the only place with this phenomenon. Anyone know why that […]
This is one of the recipes that I stare lovingly at every time I open my copy of Vegan Brunch. I have Friday off from work, and I think it will be Official I’m Finally Making Pierogi Day.
Lovely vegan pierogi recipe! I’ve made my Babci’s (my Polish grandmother) pierogi recipes before. She does mashed potato filling; sauerkraut or sauerkraut and cabbage is also delicious. My absolute fave is blueberry pierogi (fresh or frozen blueberries mixed with a bit o’ sugar, crushed cookie crumbs (to absorb the juice) and maybe some cinnamon). I fry these and top with maple syrup.
We traditionally make enormous batches of pierogi, boil ’em, and freeze ’em. Then, for Christmas and Easter, we’ll fry huge batches (the savory ones fried with onions) at family events.
When freezing, I boil first, let them dry off a bit (a wooden cutting board keeps them from sitting in puddles of water; don’t put on a cookie rack–the thin metal cuts through the soft dough and all your fillings slurp out), then freeze them on baking sheets dusted with flour. When frozen, I put them in plastic bags or containers. Make sure you label the different kinds!
You can pop frozen pierogi straight into the frying pan; they just take a little longer cook through. You can also put them in an oiled baking dish (toss them with oil, onions, sauerkraut, whatever you like) and bake until heated through.
Great photos…I love the matroshka tattoo! Goes along with the recipe nicely, I think…
I’ve made vegan perogies before…I usually have leftover filling, too. Also, I just cut the circles out and put a dallopp of filling in each one, instead of picking them off the surface, then I dip my finger into a bowl of water and go around the edge so that the seam will stick together better when boiling, because seems like it doesn’t stay together well enough if I don’t and it opens up while boiling…
Okay, I’ve loved pierogi ever since my wife and I lived in Krakow for a couple of years. But I mostly have to say I loove the tattoos. Great blog too :-).
wooooooooow different method from the others i live in Pakistan. i have master degree but not good job.now i want to make a shop i will use this method in my shop….
I must admit I’m new to Pierogis but can’t wait to try these little fellas out! Anything that has caramelised onions with it is always a go for me.
Ho lee shit. I love your matryoshka tattoos.
My grandmother would make about 300-400 every Christmas. I have been saying since going vegan that if I can make a good vegan pierogi then I can make a believer out of my mom. Our family traditionally made cheesy potato filling or sauerkraut. Do you have any recommendations for a cheesy potato solution other than using gross fake cheese?
[…] when Isa Chandra Moskowitz posted this recipe for pierogies recently, my mission was clear. Sweet potato pierogies. Done and done. […]
[…] use a vegan pierogi recipe from the Post Punk Kitchen, and it is one of the few recipes that I don’t tweak. Not even the tiniest bit! I follow […]
I’m as Polish as you get and I love this recipe. I’ve probably made double or triple batches once or twice a month since Vegan Brunch came out (big family). They freeze very well-just lay them out on a cookie sheet in the freezer so they freeze individually (just like the box ones) before packaging them up. And you’re right…It’s just not Easter brunch without them.
We made these today for the very first time.. So dang Yummy!! Thank you!!They were a labor of love but I’m hooked and will definitely be trying them again.
It does my heart good to see you write “pierogi” (the proper plural!!) instead of “pierogies.” It’s such a peeve of mine. The recipe looks great!
I made these a couple weeks ago for a potluck. Having never made pierogi in my life, I decided making a double batch was a great idea. About halfway through, I ran out of all-purpose flour and decided to just suck it up and use whole wheat for the rest. Bah. After I had gotten all my shells rolled, cut, and set aside, I went to assemble and found all the dough circles stuck together quite fiercely because of all the heat in the kitchen. Bah! I re-rolled and made about a batch worth, and the rest just became mashed potatoes because my guests had been there for almost an hour. But everyone still loved them! I added garlic and rosemary to the potatoes to make ’em a little fancier.
It’s even more legit [traditional] if you use the potato water in the dough!
When I use cheeze in the filling, chedder Daiya works just great with added nooch.
[…] many recipes for pierogi as there are types of spuds and Polish families, but I used this one from Post Punk Kitchen as I wanted a dairy free recipe for a friend with intolerances. (I find specifically dairy free […]
wondering more about the refrigeration… can i make these little bundles ahead of time? i want to have them for a party, but time won’t allow me to make them all before guests arrive… could i make them the night before, keep in fridge and boil them the next day?
You should freeze them all on a large tray. Once frozen, you can but them in a bag together with a sprinkling of flour to prevent sticking. Then boil the next day! The fridge might just make them soggy and stick together.
How much nutritional yeast/Daiya do you add to the potato mix? I’m making these for Christmas eve dinner at my Aunts house. Its my first vegan christmas and we eat a traditional Polish/Ukranian dinner…non vegan beet soup, kabasa, fish, perogies and beef cabbage rolls- I need to bring something for myself! And it better be tasty!
Thank you, thank you, thank you for posting this. I wanted to make pierogi to prove I was really Polish and not just an imposter, but all the other pierogi recipes called for sour cream in the dough. So I’m glad I found these. They were a bit hit at Christmas, and I taught a friend’s kids to make them, as I enlisted them as my minions. My Polishness has been proven with these pierogis, and I believe a new Christmas tradition has been started in my family. You rock, Isa!
[…] actually tastes good (thanks Daiya!) I decided to make cheddar and potato pierogies. I used the dough recipe from the PPK but note that I didn’t add anywhere near the additional cup of flour. I only added between ¼ to […]
Thank you for the recipe- I have used a couple of times already. I bought a “pierogie maker” on Amazon because I have never been able to shape them right. This little kitchen tool has made it much easier to make (and they don’t look like weird blobs anymore!)
Thanks for this recipe, Isa. After many years of perogy-making as a child with my grandmother, I have seldom dared to go do it on my own due to super thick and doughy results. Up until now, I thought thin and tender dough was only the result of decades of dedicated practice. This dough recipe is amazing….rolls out nice and thin, without too much rebound! I’m so happy that now I can make homemade dough with confidence (and without a pasta-maker)! Thank you!!!!
This looks like a great recipe, and I say that as a polack with lots of pierogi experience! haha. I high recommend your favorite vegan sour cream with these, and also using garlic and lots of oil when you fry them.
Made this this weekend! Added mushrooms to the potato mixture and it was amazing. Thank you for posting as I used to love these before I went vegan 🙂
We bought pierogies yesterday from a local church, bought prune, potoatoe and cabbage, went to eat leftovers today and realized the cabbage dough is not thoroughly cooked, very doughy, can this make my kids sick, they already ate a lot of them?
If they’re steamed then the dough is supposed to be pretty doughy. As far as making your kids sick, I have no idea! This is definitely not the place to come for medical advice. Please call your doctor for that.
Looks yummy! Can you use quinoa flour or another substitute to make them gluten-free? Thanks!
just made these with another random leftover filling (soyrizo/potato filling for tacos!). delicious! the dough made everyone eat the leftovers.
I made this for a potluck with a bunch of my meat-eating guy friends. I added roasted poblano peppers to the potato and served it with a spicy chili-dill sauce. (I’m a Texan, what can I say?) The guys devoured them! Thanks!
[…] I used two different types of dough, just to see which one I liked better, but they were roughly the same. If you are vegan, or if you like to eat vegan as often as you can, check out this recipe for vegan perogies from Post Punk Kitchen. […]
I think homemade dough is always best for all recipes. I love potato’s, and want to try this potato pierogi.
This is awesome! Just like Gamma Phyllis makes us!